はじめに
こんにちは。HoloLensチームの野元です。
本記事は、Azure Communication Services(以降、ACSと称します)を使って、HoloLens 2とPC間でビデオ通話することを目的として実施した調査・検証結果をまとめたものです。
ACSの概要
ACSとは
音声・ビデオ・チャットなどのリアルタイム通信ができるAzureサービスのことです。https://docs.microsoft.com/ja-jp/azure/communication-services/overview
価格
ビデオ通話の利用には1ユーザーあたり約0.5円/分の費用が掛かります。(記事執筆時点)https://azure.microsoft.com/ja-jp/pricing/details/communication-services/
ACSのビデオ通話に使用するSDK
適宜、アプリケーションに次のSDKを導入します。
Azure.Communication.Identity
クライアントの認証、ユーザーIDの作成、アクセストークンの発行をする機能を提供します。
Azure.Communication.Calling
ビデオ通話に関する機能を提供します。
ACSのビデオ通話に必要なもの
1. ACSのAzureリソース(Communication Services)
ACSのサービスを利用する上で必要となるため、下記の手順を参考にしてCommunication Servicesのリソースを作成します。
2. ユーザーアクセストークン
ACSのCalling SDKを使ったビデオ通話をする上で、ユーザーアクセストークンが必須となります。
Identity SDKを使うことで、クライアントの認証→ユーザーIDの作成→アクセストークンの発行が可能となります。アクセストークンは、各クライアントごとに必要であり、有効期限は発行から1日間です。
下記にアクセストークンの発行方法を示します。
Azure Portalからアクセストークンを発行する方法
クイック スタート – テスト用の Azure Communication Services アクセス トークン をすばやく作成する
プログラムを書いてアクセストークンを発行する方法
3. 通信先のユーザーIDもしくはグループID
1対1のビデオ通話
通信先のユーザーIDが必要です。(ユーザーIDとはアクセストークンの発行の際に使用されるもののことです)
グループビデオ通話
グループIDが必要です。(グループIDはGuidでよしなに生成できます)
ACSのビデオ通話検証
検証環境
- Windows 10
- Visual Studio 2022
- Unity 2021.3.2f1
システム構成
次の3つのアプリケーション間でグループビデオ通話を行うことで、HoloLens 2とPC間でのビデオ通話が可能となります。
HoloLens 2で動かすアプリケーション
- Unityアプリケーション
- 3Dオブジェクト込みのビデオ通話を担当
- 2DUWPアプリケーション
- PCのビデオ映像のレンダリングを担当
PCで動かすアプリケーション
- 2DUWPアプリケーション
- HoloLens 2とのビデオ通話を担当
注意事項(記事執筆時点)
- Unityではビデオ映像のレンダリングができません。一方で、2DUWPアプリではビデオ映像のレンダリングができます。そのため、Unityと2DUWPのアプリケーションを併用することで、リモートクライアントの映像をHoloLens 2でも描画することが可能となります。
- ACSではスピーカーを制御する機能が提供されていません。そのため、1つのデバイスで2つのACSアプリを起動して同一のグループビデオ通話に入ると、自分が話した音声がスピーカーからも聞こえる現象が発生します。
- HoloLens 2で表示している3Dオブジェクト込みのビデオ通話を行うには、Unityを使用する必要があります。ただし、転送するビデオ映像には3Dオブジェクトの表示が強制されます。
- SDKはUnity Packageが用意されていないため、Nuget Packageから必要なものをよしなにUnityに取り込む必要があります。次にCalling SDKのUnityへの導入方法を示します。
UnityへのCalling SDKの導入方法
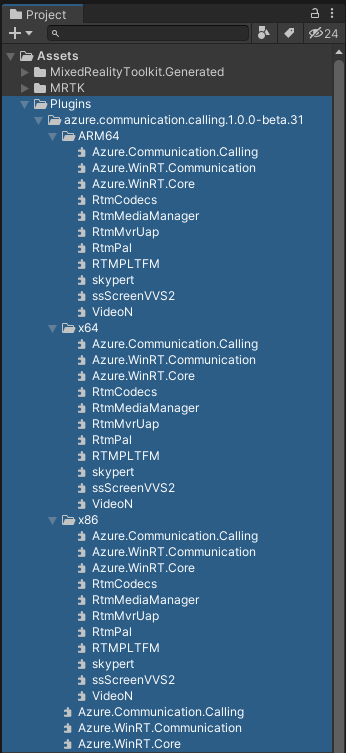
ダウンロードしたSDKの拡張子を.nupkg→.zipに変更後、下記のファイルを取り出しUnityにインポートします。下記に太字でUnityにインポートする際の階層例を示します。
- Assets\Plugins\azure.communication.calling.1.0.0-beta.31
azure.communication.calling.1.0.0-beta.31\lib\uap10.0配下の.winmdをすべてインポートします。- ARM64
azure.communication.calling.1.0.0-beta.31\runtimes\win10-arm64\native配下の.dllをすべてインポートし、各.dllのプラットフォームのCPU設定をARM64にします。
- x64
azure.communication.calling.1.0.0-beta.31\runtimes\win10-x64\native配下の.dllをすべてインポートし、各.dllのプラットフォームのCPU設定をX64にします。
- x86
azure.communication.calling.1.0.0-beta.31\runtimes\win10-x86\native配下の.dllをすべてインポートし、各.dllのプラットフォームのCPU設定をX86にします。
Unityでのグループビデオ通話の実装例
下記のようなスクリプトを用意し、初期化処理(InitializeAsync())を実行した後に、グループビデオ通話の開始(GroupCallButton_ClickAsync())を行うことで、複数クライアント間でのグループビデオ通話が可能となります。もちろん、音声のみの通話も可能です。
#if WINDOWS_UWP
using Azure.WinRT.Communication;
using Azure.Communication.Calling;
#endif
using System;
using System.Collections.Generic;
using System.Threading.Tasks;

namespace Nextscape.AzureCommunicationServices
{
    /// <summary>
    /// AzureCommunicationServicesのCalling SDKの機能を提供します。
    /// </summary>
    public class ACSCalling
    {
#if WINDOWS_UWP
        private CallMode _callMode = CallMode.AudioAndVideo;
        private CallClient _callClient;
        private CallAgent _callAgent;
        private Call _call;
        private DeviceManager _deviceManager;
        private LocalVideoStream[] _localVideoStream;
        private Dictionary<string, RemoteParticipant> _remoteParticipantDictionary;

        /// <summary>
        /// 初期化処理を実行する
        /// </summary>
        public async Task InitializeAsync(CallMode callMode, string accessToken, string userName)
        {
            _callMode = callMode;
            _callClient = new CallClient();
            if (_callMode == CallMode.AudioAndVideo)
            {
                _deviceManager = await _callClient.GetDeviceManager();
                _localVideoStream = new LocalVideoStream[1];
            }
            var token_credential = new CommunicationTokenCredential(accessToken);
            var callAgentOptions = new CallAgentOptions()
            {
                DisplayName = userName
            };
            _callAgent = await _callClient.CreateCallAgent(token_credential, callAgentOptions);
            if (_callMode == CallMode.AudioAndVideo) _callAgent.OnCallsUpdated += Agent_OnCallsUpdated;
            _callAgent.OnIncomingCall += Agent_OnIncomingCall;
        }

        /// <summary>
        /// 1対1のビデオ通話を開始する
        /// </summary>
        public async Task CallButton_ClickAsync(string destinationUserId)
        {
            if (_callMode == CallMode.AudioAndVideo) await GetCameraDeviceAsync();

            var startCallOptions = new StartCallOptions();
            if (_callMode == CallMode.AudioAndVideo) startCallOptions.VideoOptions = new VideoOptions(_localVideoStream);
            var callees = new ICommunicationIdentifier[1]
            {
                new CommunicationUserIdentifier(destinationUserId)
            };
            _call = await _callAgent.StartCallAsync(callees, startCallOptions);
        }

        /// <summary>
        /// グループ通話を開始する
        /// </summary>
        public async Task GroupCallButton_ClickAsync(string groupId)
        {
            if (_callMode == CallMode.AudioAndVideo) await GetCameraDeviceAsync();

            var groupCallLocator = new GroupCallLocator(Guid.Parse(groupId));
            var joinCallOptions = new JoinCallOptions();
            if (_callMode == CallMode.AudioAndVideo) joinCallOptions.VideoOptions = new VideoOptions(_localVideoStream);
            _call = await _callAgent.JoinAsync(groupCallLocator, joinCallOptions);
        }

        /// <summary>
        /// 通話を終了する
        /// </summary>
        public async Task HangupButton_ClickAsync()
        {
            var hangUpOptions = new HangUpOptions();
            await _call.HangUpAsync(hangUpOptions);
        }

        /// <summary>
        /// 電話の着信を受け入れる
        /// </summary>
        private async void Agent_OnIncomingCall(object sender, IncomingCall incomingcall)
        {
            if (_callMode == CallMode.AudioAndVideo) await GetCameraDeviceAsync();

            var acceptCallOptions = new AcceptCallOptions();
            if (_callMode == CallMode.AudioAndVideo) acceptCallOptions.VideoOptions = new VideoOptions(_localVideoStream);
            _call = await incomingcall.AcceptAsync(acceptCallOptions);
        }

        /// <summary>
        /// リモート参加者とビデオストリーム
        /// </summary>
        private async void Agent_OnCallsUpdated(object sender, CallsUpdatedEventArgs args)
        {
            foreach (var call in args.AddedCalls)
            {
                foreach (var remoteParticipant in call.RemoteParticipants)
                {
                    var remoteParticipantMRI = remoteParticipant.Identifier.ToString();
                    _remoteParticipantDictionary.Add(remoteParticipantMRI, remoteParticipant);
                    await AddVideoStreamsAsync(remoteParticipant.VideoStreams);
                    remoteParticipant.OnVideoStreamsUpdated += async (s, a) => await AddVideoStreamsAsync(a.AddedRemoteVideoStreams);
                }
                call.OnRemoteParticipantsUpdated += Call_OnRemoteParticipantsUpdated;
                call.OnStateChanged += Call_OnStateChanged;
            }
        }

        private async void Call_OnRemoteParticipantsUpdated(object sender, ParticipantsUpdatedEventArgs args)
        {
            foreach (var remoteParticipant in args.AddedParticipants)
            {
                var remoteParticipantMRI = remoteParticipant.Identifier.ToString();
                _remoteParticipantDictionary.Add(remoteParticipantMRI, remoteParticipant);
                await AddVideoStreamsAsync(remoteParticipant.VideoStreams);
                remoteParticipant.OnVideoStreamsUpdated += async (s, a) => await AddVideoStreamsAsync(a.AddedRemoteVideoStreams);
            }
        }

        /// <summary>
        /// 通話状態の更新
        /// </summary>
        private async void Call_OnStateChanged(object sender, PropertyChangedEventArgs args)
        {
            switch (((Call)sender).State)
            {
                // 通話終了
                case CallState.Disconnected:
                    break;
                default:
                    break;
            }
        }

        /// <summary>
        /// リモートビデオをレンダリングする
        /// </summary>
        private async Task AddVideoStreamsAsync(IReadOnlyList<RemoteVideoStream> streams)
        {
            foreach (var remoteVideoStream in streams)
            {
                var remoteUri = await remoteVideoStream.Start();
            }
        }

        /// <summary>
        /// 利用するカメラを取得する
        /// </summary>
        private async Task GetCameraDeviceAsync()
        {
            if (_deviceManager.Cameras.Count > 0)
            {
                var videoDeviceInfo = _deviceManager.Cameras[0];
                _localVideoStream[0] = new LocalVideoStream(videoDeviceInfo);
                var localUri = await _localVideoStream[0].MediaUriAsync();
            }
        }
#endif
    }

    /// <summary>
    /// 通話モード
    /// </summary>
    public enum CallMode
    {
        // ビデオ通話
        AudioAndVideo = 0,
        // 音声通話
        Audio,
    }
}
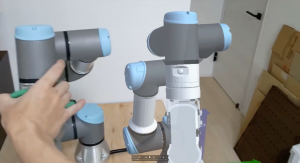
グループビデオ通話が動作している様子
HoloLens 2でACS.UnityアプリとACS.2DUWPアプリを、PCでACS.2DUWPアプリを動作させてグループビデオ通話をしている様子を以下に示します。
動画を見るとわかるように、HoloLens 2とPC間でグループビデオ通話を行い、HoloLens 2でもPC映像のレンダリングができています。
ただし、HoloLens 2で2つのACSを起動し同じグループで通話をしていることにより、自分の声がスピーカーから聞こえる状態となっています。現状、ACSにスピーカーをOFFにする機能はないため、これを解決する手段はありませんが、「3Dオブジェクト込みの映像転送」をしたい場合はACS.Unityアプリだけを使用し、「リモートビデオのレンダリング」をしたい場合はACS.2DUWPアプリだけを使用するといった方法で対応することが可能です。
まとめ
ACSを使用すると、HoloLens 2とPC間でビデオ通話を行うことができます。
ただし、Unityではビデオ映像のレンダリングに非対応となっているため、一工夫が必要となります。
また、本格的にサービスにACSのビデオ通話の機能を組み込んでいく際には、ユーザーID・アクセストークン・グループID等の管理をしっかりと行う必要があります。
まだ機能的に不完全ではあるものの、比較的簡単にビデオ通話を導入できるので、ユースケース次第ではサービスに組み込む選択肢も十分にあると思います。